Thursday, July 31, 2008

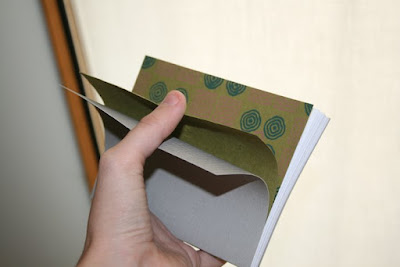
Craft: Paperback Bookbinding


Paperback Book
Cardstock, Recycled Paper, and Printer Paper

I found this fun site which shows you how to make paperback books. Now, I've already tried my hand at making hardbound books with some good results, but I wanted paperback! So I found this site which has photo tutorials, a discussion on glue types, and video! Plus things you can make to make the process even easier. And it not that hard to start with!

If I wanted to I could even hardbind this book! I love books.

Can't wait until I actually make one with words or images in them. Especially my own! Right now these go in my purse and give me something awesome to write on when I'm out and about. It looks awesome and doesn't cost a fortune. <3

Also, in other blog news, I'm going to move all the craft posts to a craft blog and use this one for painting fun-ness and linking to ebay. So don't be surprised when everything tagged "crafts" ups and runs.

Ja!

Tuesday, July 29, 2008

Craft: Dorodango

I'll upload a picture after we get the stupid things dry.

*edit*PICTURE!

What are dorodango, you ask? Shiny mud balls! Apparently young children in Japan really like forming these balls of mud, and sites explaining how to make them are popping up all over the interwebs (with the same set of instructions, heh).

Over coffee one morning three days ago my mom complained about being bored, and of course I suggested we try our hand at sculpting mud. She said I was being ridiculous and flat out refused. Three hours later we were covered in mud and, despite written instructions and video, had no idea what we were doing. Three days later we kinda figure it out and get one done, and start and almost finish another. Woo! They don't shine, but, whoa! They're like rocks or something. It's so cool!

And despite beautiful pictures and the fact that preschoolers like doing this, we just aren't getting it down! We want shine!! I guess I would settle for a smooth "capsule" of unbroken dirt, but that's another story. So, no painting. After three days of this, I'm muddy and tired. I might write about another palette. I've been thinking about the faux fauve palette, and after dealing in mud, I need the color!

Ja!

Monday, July 28, 2008

Painting a Day - 26

Odd Sizes
5 x 7
Acrylic on Shellaced Mattboard


I'm a bit out of practice and I still don't know why I'm using acrylic either. I think I'll start using oil again. I thought I was doing something different and getting all into different mediums, but it's just not doing anything for me. Bleh. feel so much more... plastic... than oil. (yes, yes, I know!)

Oh well... oil definitely tomorrow. Or maybe not. I don't think I should let paint get the better of me ^_^

I'm just used to my nice, subtle color, and then I get bright red! bright yellow! bright blue!! For someone using the zorn palette so much, it's a bit of a change as well.

OMG! Those little pool balls are so cute. I've got a whole set. I've also got some new large ones, and some old large ones that I want to play with. I mean paint. Some are shiny, some are very dull. I'm sure everyone thinks I'm nuts now. Oh well! Something is so pleasing about a tiny pool ball and a shot glass. I think I'm just going to do some paintings of just that. I didn't really need to paint the tomato, avacado or onion, really. But I'm glad. It's kinda a study in contrasting colors and value. High keyed yellow and a nice red purple, and that nice orangy red and the dark green. and I like the kinda cream towel with the light blue/purple hazy background. Color theory FTW, yo.

Ja!

Wednesday, July 23, 2008

How To: Woodburned Kenshin Bracelet

Wood
Pyrography
Watercolor
Metalic Paint

I just love crafts. So, I joined a site: cut out + keep and have uploaded pictures of my projects, including a how to of this project.

Kenshin woodburning! Gold Paint! Water Color! Woo!

I know. Anime. Kenshin. Crafts. Maybe an MFA will beat it out of me. I should do that soon.

:3

Next article: Faux Fauve Palette! Next How to: I'll illustrate the The Giacometti Article because it's a little bit (ok, very) hard to understand if you've not seen it done.
Ja!

Tuesday, July 15, 2008

Article: Giacometti Drawing Technique

Alberto Giacometti.

One of my transplant professors once remarked that he thought that the art department should build an alter to Giacometti for us to bow down to every morning. I guess he had a point, as every teacher who had been there taught the Giacometti method (Usually just referred to as Giacometti) as if it were some form of scripture. My favorite teacher, at the beginning of every semester, would hand out the Giacometti Waiver to all of his students which suggested if they didn't use the method it was their own decision and if their artwork didn't turn out as planned, well, too bad. It was a technique that undoubtedly worked, but was such a pain in the butt to learn.

Albert Giacometti seemed to me an odd choice. The method didn't typically render anything remotely in his style (from what I could see) and I really had no idea what he had to do with the whole thing. The story I heard (but could never really verify) stated he was hit by a taxi and became obsessed with where things appeared in space. The searching lines so obvious in his work are the only things that connect the man and the method. At least for me. If you can clear this up, please leave a comment.

I'm moving on to the technique.

When an artist looks it does not matter what is being looked at. A still life, a landscape, a person, anything, the object doesn't matter. The only thing that matters for a perfect rendering is where everything is. As my teacher puts it, "The most important thing in drawing is the most important thing in real estate: Location, Location, Location!" A shape isn't important. Do not try to reproduce a shape, but the location of the shape. Do not ask "What shape is that?" but ask "Where?" Where exactly it seems to fade, or become darker, or something else entirely? This may seem overwhelming at first, where exactly do we start on a blank sheet of paper? How do we measure?

The Grid

The grid is not a new concept for artists. Durer has an infamous set up that comes readily to mind. I am sure everyone finds the concept familiar: Evenly spaced vertical and horizontal lines are placed on the drawing and painting surface, scaled down and put on the image that is being reproduced, and the relationship between the objects and the lines is dutifully reproduced in a scantron like way. Yay.

What is wrong with this? A few things come to mind. The first problem is without a complicated 3D grid set up in front of a model, you are stuck reproducing flat, already drawn images, or photographs. Which I think is pretty good for practice, but doesn't work so well if you want to draw from life, do plein air landscapes, or work from a master copy you cannot grid off (without getting kicked out of the museums at any rate).

It is also arbitrary. We can choose one inch grids, two inch, five centimeters, whatever, and the only thing that really matters is the proportion of the two grids. There is no real relation between the grid and the objects being created. The grid certainly makes the process easier, and it does have its place in learning, but it's good to know the limitations of tools.

And with this type of grid, an artist will more than likely put down a contour line and rarely move it. The searching lines that put an object in space are lost.

The Giacometti Grid

The defining characteristic of the Giacometti grid is that the vertical and horizontal lines used are a response to the objects themselves. The lines are not some arbitrary tool, but an integral part of the drawing process that allows the artist to really engage in a conversation with what is seen.

A lot of artists, while drawing, will use a vertical line to see where a shoulder lines up with the foot of a figure, or how high an apple is compared to the honey jar in a still life. It's a pretty common practice to use a plumb line (or a paintbrush as one). And the Giacometti grid is no different, except in application. In a pure Giacometti drawing, no diagonals or contour lines are expressed. Just the searching, vertical and horizontal lines of relationships between points.


Giacometti Figures in a Room
18 x 24
Graphite on Newsprint

This is one of my first (fairly) good Giacometti drawings I did almost four years ago. I was still relying too much on contour, but I am getting the searching line down.

Their are two ways to use this method, the first you can decide to do a gesture to get things in kind of the right position, and then begin moving things to the exact location. For that image I did not start with a quick gesture (do not read as outline, I'll do another article on gesture drawing soon).

Let's say we are drawing a still life with bottles and apples.

To start, you pick a place to put a vertical line, such as the edge of a bottle, or the center, and make sure you lightly add this line all the way from the top to the bottom of the paper, not just where you think the object should begin and end. If you want to, mark the points where you think this will be the case. Then move on to another vertical, where the space between the two lines will be the space between two objects. The key to this step is working very lightly. These lines are not etched in stone and will have to be moved.

I usually do a few vertical, and move on to horizontal lines, eye level or the horizon is a good horizontal to start with. Then I work with the heights of the objects, and seeing where those grid lines intersect with the other objects.

After that work back and forth. The relationship between all the lines is what is important, so measure distances, and see exactly where all the lines cross, meet. Do not feel you have to stay with a line, if a line you've already done seems to be in the wrong place. Remember, place is the most important! Just make a darker, more correct line. Through the course of the drawing, you'll get darker and darker, and everything should be more and more correct.

Proportions are easy to measure, and if you get something wrong, you don't have to erase, just a new line, a new point, and on to correct everything else.

I like to keep little notes, small dots that suggest the nature of what they represent. A dark smudge for a shadow, longer dot for a line, small bent line for a corner. These are not outlines, but small notes that are easy to move around. That way we are not married to our outlines. Because there are none!

While the obvious drawback is this technique in its pure form will not result in a finished piece, using this form for practice will help anyone see location so they can become a better draftsman. The other drawback is that this technique is hard to learn. I have seen some of the best artists just reduced to tears while learning this. (And blind contour drawing as well, but more people seem familiar with this.) But it is invaluable if you ever do learn this. Everyone can use it in the composition stages of their work, and everyone who learns and masters this technique is always a better artist than when they started.

Tune is next time when I explain this with how to pictures.
I've just been informed artists are visual learners and I'm an anomaly. Fun.

Ja!

Monday, July 14, 2008

BookBinding


Front of the book!Inside of the book!
Back of the book.

Yes, I know, I forgot the spine. And it's a real shame because it's this AWESOME orange stripe. <3

I found my card reader under the seat of my car under more fabric than I should have. At least I think that now after digging under all of that to get to the stupid thing. I can't even remember why it was in my car to begin with.

Well, on to the instructions. After I get better at this I promise to put up a tutorial. (Though if you do a search either in google or stumbleupon there are a ton of good sites!) I got the basic idea for this on one of those.

Ok, so paper. Basic computer paper for this thing. I'm used to Rives BFK (if you can spare 5.00 a sheet it's my favorite!) and so this paper seemed a bit flimsy. Worked out all right. I didn't trim the edges because I wanted the 'handmade' look, but it's just not the same without the deckling. So, I cut the paper in half short ways, then folded four long sheets together paper, and stitched those together. I didn't have any mull or anything, so basic tulle and some random strips of fabric I had sufficed. For the boards, I used acid free matboard that I have in large quantities. Basic Elmers glue, basic fabric, and tada! Book!

I don't use a book press, cuz I don't have one. In school I used this giant (And HEAVY!) piece of metal. This time I just used spring clips around the whole thing. Works quite well. And I used pieces from a metal clothes hanger to make the spine of the book have that nice curve.

If I was to do it differently?

Uh... more glue. Lots more glue. And different paper. Blegh. If I hadn't had the paper already cut and pretty much put together (Summer project for kids not finished) I wouldn't have begun to use it.

I figure this counts as two painting a day projects. I know, excuses aren't becoming. XP

Until I finish my next projects (painting, writing, quilting and pyrography!)
Ja!

Wednesday, July 09, 2008

Painting a Day - 24 & 25


Apple
Acrylic on Card
5 x 7 (ish)

So I haven't done this in awhile and it shows. I didn't really want to gesso my cards, so I worked with acrylic, but I should have just gone ahead and worked in oil. The texture on that one piece of matboard is... gonna take a bit to get used to, but I can see it working.

I did two to try and get back into painting. My first one (Surprisingly) looks good. My second one, not so much.

Well, here's to getting better!

Ja